1. THE OUTCOME
When you finish, Outlook will stop “guess-sorting” your email. Focused and Other tabs disappear, and new mail lands in one unified Inbox. If your mailbox still has the legacy Clutter feature, it stops moving messages into the Clutter folder. If you apply the admin step, this becomes the default for the whole organization (with a propagation delay).
2. BEFORE YOU START
- Required (account type):
- Focused Inbox: available for most Microsoft 365 / Exchange mailboxes.
- Clutter: legacy feature; may not exist in your tenant anymore.
- Required (permissions):
- User-level steps: standard mailbox access.
- Tenant-wide step: Exchange Online admin + PowerShell access.
- Required (device/app):
- Classic Outlook for Windows (Microsoft 365 / 2021 / 2019 / 2016) OR New Outlook for Windows
- Outlook on the web (OWA / Outlook.com)
- Outlook mobile (iOS/Android)
- Optional but helpful (prevents “settings reverted” issues):
- Know whether your org enforces mailbox policies.
- Be ready to change the setting in Outlook on the web (it often “sticks” best).
- Time estimate:
- Per user/device: ~1–5 minutes
- Tenant-wide: ~10 minutes to run + 24–48 hours for rollout
3. THE STEPS
Follow the steps that match where you read mail. If you use multiple clients (desktop + web + mobile), do all applicable sections.
Step 1: Identify which Outlook you’re using
Check whether you’re in Classic Outlook, New Outlook, or a browser.
- On Windows:
- Classic Outlook usually shows a full ribbon with File, Home, Send/Receive, View.
- New Outlook is the newer UI and often shows a simplified toolbar and a Settings gear.
- On the web: your address bar shows
outlook.office.comoroutlook.com.
Expected result: You know which path below matches your UI, so you don’t hunt for a missing toggle.
If a guide says “go to View” but you don’t have a View ribbon tab, you are likely in New Outlook or Outlook on the web.
Step 2: Disable Focused Inbox in Classic Outlook for Windows
Use the ribbon toggle first. It’s the fastest and most reliable in Classic Outlook.
- Click View (ribbon tab).
- Click Show Focused Inbox to turn it off.
Expected result: The Focused and Other tabs at the top of your message list disappear. You see a single Inbox list.
If you want a quick verification: send yourself a test email and confirm it arrives in Inbox with no Focused/Other split.
Step 3: Disable Focused Inbox in Classic Outlook using Quick Settings (hidden shortcut)
If the ribbon toggle is missing or disabled (common in customized ribbons), use Quick Settings.
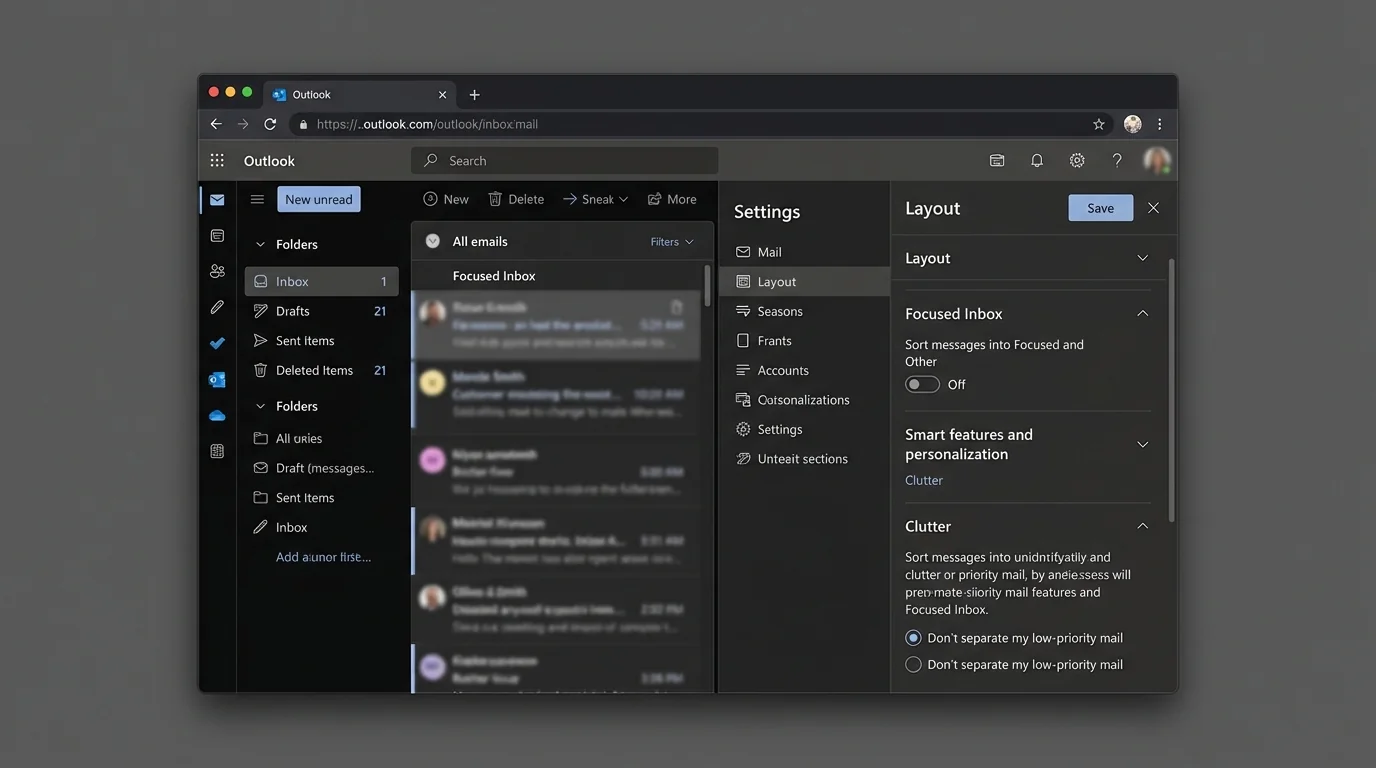
- Click Settings (gear icon, top right).
- In the Quick settings pane, find Focused Inbox.
- Toggle Focused Inbox to Off.
Expected result: Focused/Other tabs disappear (or remain hidden after a short refresh).
Quick Settings is often present even when the View ribbon command is missing.
Step 4: Disable Focused Inbox in Outlook on the web (most “permanent” user setting)
This updates the server-side mailbox preference, which tends to persist across devices.
- Open Outlook on the web.
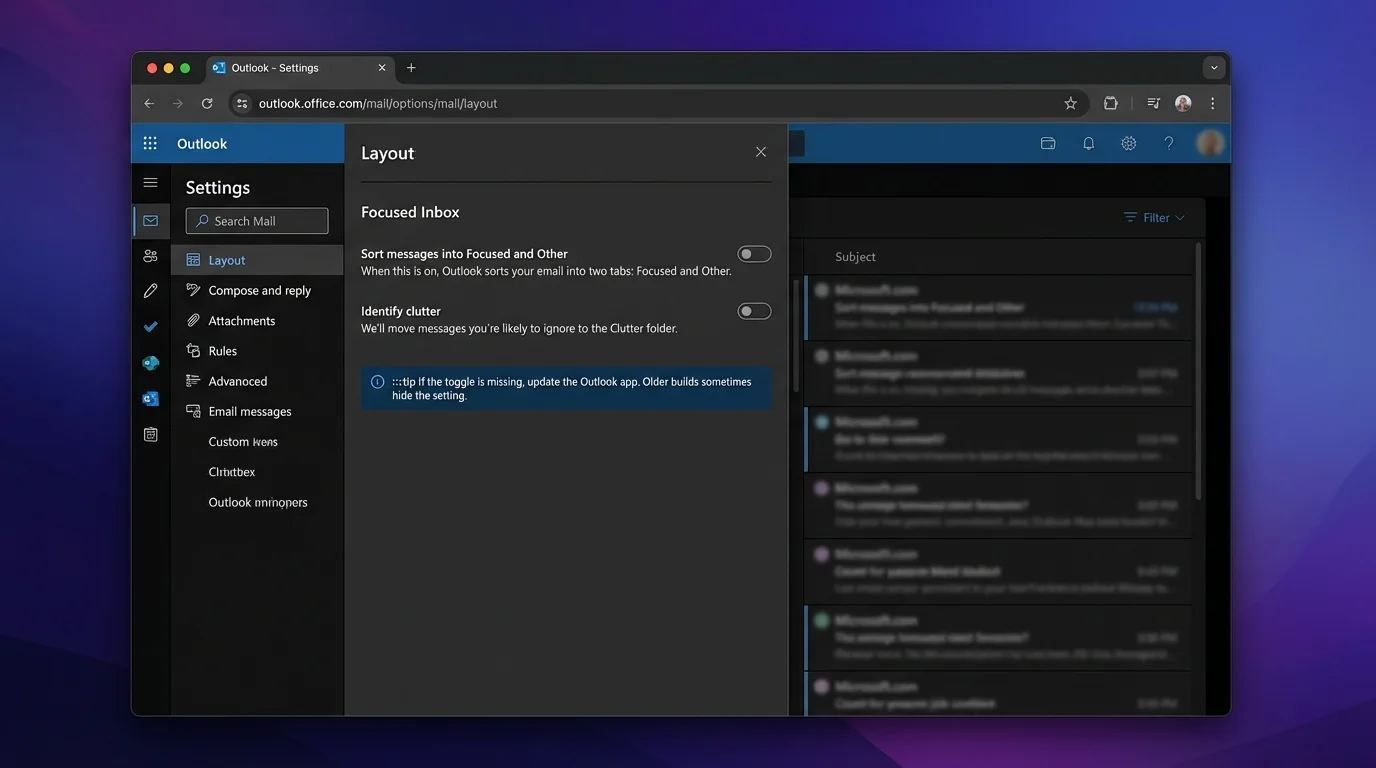
- Click Settings (gear icon).
- Click View all Outlook settings.
- Navigate to Mail > Layout > Focused Inbox.
- Select Don’t sort my messages (or toggle Focused Inbox off, depending on UI).
- Click Save.
Expected result: Your web inbox no longer shows Focused/Other tabs. Mail is not split.
If you use multiple devices, do this step even if you already turned it off on desktop. This setting frequently becomes the “source of truth.”
Step 5: Disable Clutter in Outlook on the web (legacy mailboxes)
Clutter is managed in the web settings when available.
- In Outlook on the web, click Settings (gear icon).
- Click View all Outlook settings.
- Navigate to Mail > Automatic processing > Clutter.
- Uncheck Separate items identified as Clutter (or choose Don’t separate items identified as Clutter).
- Click Save.
Expected result: Outlook stops moving messages into the Clutter folder.
Disabling Clutter usually does not delete the Clutter folder. It only stops future automated moves.
Step 6: Disable Focused Inbox in Outlook mobile (iOS/Android)
Mobile apps keep their own toggle, so do this even if desktop is already fixed.
- Tap your profile icon (top left) or the menu.
- Tap Settings.
- Under Mail (or General, depending on version), find Focused Inbox.
- Toggle Focused Inbox to Off.
Expected result: The app shows a single inbox view (no Focused/Other tabs).
If the toggle is missing, update the Outlook app. Older builds sometimes hide the setting.
Step 7: Confirm you didn’t just hide the tabs (verify behavior)
You’re not done until you confirm Outlook is no longer algorithmically sorting.
- Send yourself two emails:
- One from a known contact
- One from a new address (or a newsletter) - Refresh your inbox.
- Check whether either message lands in a separate tab or unexpected folder.
Expected result: Both messages appear in the same Inbox list (unless you have other rules/filters).
Step 8: Fix “it re-enables after restart” by refreshing cloud settings sync
This targets the common state where Outlook keeps restoring an older preference.
- In Outlook desktop, click Settings (gear icon).
- Search for a setting similar to Store my settings in the cloud (wording varies).
- Toggle it Off, wait ~10 seconds, then toggle it On.
- Re-apply Step 2 or Step 3 (Focused Inbox off).
- Close Outlook completely and reopen it.
Expected result: Focused Inbox remains off after restart.
If you can’t find the cloud setting in your build, do Step 4 (Outlook on the web) next. Server-side settings often override the desktop “flip-flop.”
Step 9: Fix “toggle is missing” by switching to the web setting (and/or Classic Outlook)
This is the fastest path when the UI simply won’t show the option.
- Do Step 4 in Outlook on the web.
- Return to desktop Outlook and restart it.
Expected result: Focused/Other stays gone on desktop too.
If your org uses New Outlook and the toggle plays hide-and-seek, the web setting is usually the most consistent place to set it.
Step 10: Fix profile-specific glitches by creating a new Outlook profile (Windows)
If it works in one profile but not another, your Outlook profile may be corrupted.
- Close Outlook.
- Open Control Panel.
- Click Mail (Microsoft Outlook).
- Click Show Profiles.
- Click Add and create a new profile.
- Sign in and let mail sync.
- Re-do Step 2 (or Step 4 if you prefer server-side).
Expected result: The new profile keeps Focused Inbox off reliably.
Creating a new profile can reset local-only preferences and may re-download cached mail.
Step 11: Disable Focused Inbox tenant-wide (admin PowerShell)
Use this when you need “permanent” at the organization level—especially when user settings keep getting overridden.
- Connect to Exchange Online PowerShell.
- Run:
Set-OrganizationConfig -FocusedInboxOn $false
- Wait for propagation.
Expected result: Focused Inbox is disabled by default across the tenant. Users should stop seeing the feature reappear.
Set expectations: rollout commonly takes 24–48 hours to fully apply.
4. COMMON PATTERNS (what to do after you disable sorting)
Focused Inbox and Clutter exist because Outlook tries to reduce noise using algorithmic sorting. Once you remove that, you’ll likely want a predictable, controllable pattern.
Pattern 1: Keep one inbox, but redirect unknown senders
- Goal: Known people stay in Inbox; unknown senders get reviewed later.
- Rule concept: If sender is not in Contacts, move to a review folder.
- Reality check: Outlook rules can’t reliably do “not in contacts” for every case without edge conditions.
Copy-paste values for a manual approximation:
- Condition: From contains specific domains you trust (partners)
- Action: Keep in Inbox
- Condition: From contains common marketing domains (your list)
- Action: Move to Newsletters
Pattern 2: Split newsletters into a single place (no guessing)
- Goal: No newsletters in Inbox.
- Example values:
- Condition:
from:@substack.com - Action: Move to folder
Newsletters+ mark as read (optional)
Pattern 3: Create a “Receipts and Notifications” parking lot
- Goal: Receipts don’t interrupt your day.
- Example values:
- Condition: Subject contains
receiptORinvoiceORorder - Action: Move to folder
Receipts
Pattern 4: Protect yourself from “urgent” impersonation patterns
- Goal: Don’t let subject-line urgency control attention.
- Example values:
- Condition: Subject contains
urgentORaction required - Action: Categorize
Review(do not move)
If you want the strategy behind these patterns (and why sorting fails), read: AI Email Sorting vs Whitelisting for Inbox Control.
5. THE BETTER WAY (stop sorting; start screening)
Disabling Focused Inbox and Clutter removes one layer of algorithmic sorting. That’s good—but it still leaves you with the core problem: the “open inbox”.
An open inbox means strangers can reach you by default, and you’re stuck doing constant triage:
- deleting,
- scanning,
- unsubscribing,
- and second-guessing whether Outlook guessed wrong.
That’s the exact failure mode behind Focused/Other tabs: algorithmic sorting creates decision fatigue and notification anxiety when it inevitably misclassifies.
KeepKnown flips the model using strict allow-listing (contact-first filtering):
- KeepKnown connects via OAuth2 and runs at the API level (not a plugin).
- Mail from non-contacts is automatically moved into a dedicated folder/label: KK:OUTSIDERS.
- Your Inbox becomes “known senders only”—no guessing, no training, no tabs.
Why this is “permanent” in a way Outlook toggles are not:
- Sorting features can be re-enabled by updates, policies, or sync bugs.
- Screening is a protocol: only known senders reach Inbox, regardless of which Outlook client you open.
Relevant reading if you want to implement the methodology directly:
- How to Configure Strict Allow Listing in Outlook 365
- Stop Organizing Email Start Screening It
- AI Email Sorters Make Executives Less Safe
If you want the simplest operational setup: disable Focused Inbox/Clutter (this tutorial), then implement allow-listing so only the right people reach you. KeepKnown is built to do that automatically at https://keepknown.com.
6. TROUBLESHOOTING
Use this section when the UI doesn’t match screenshots or settings won’t stay.
1) If the “Show Focused Inbox” button is missing, then use Quick Settings or the web setting.
- Try Step 3 (Settings gear > Focused Inbox).
- If still missing, do Step 4 in Outlook on the web and restart desktop.
2) If Focused Inbox keeps re-enabling after restart, then reset settings sync and reapply.
- Do Step 8 (toggle cloud settings sync off/on if available).
- Then reapply Step 2/3.
- If your org controls settings, do Step 11 (admin).
3) If you can’t disable Focused Inbox on a managed work account, then assume an org-level override.
- Ask your admin to run Step 11.
- Allow 24–48 hours after the change.
4) If Clutter settings don’t exist, then your tenant likely doesn’t use Clutter anymore.
- That’s normal. Many environments have phased it out.
- You only need to disable Focused Inbox.
What “permanent” realistically means
- Permanent for your mailbox: disable it in Outlook on the web (Step 4) + confirm in desktop/mobile.
- Permanent for everyone: apply tenant-wide PowerShell (Step 11) and give it time to propagate.
- Permanent relief from triage: replace sorting with screening (KeepKnown’s contact-first filtering).