1. THE OUTCOME
When you finish, Outlook will treat your Inbox like a guest list: email only lands in Inbox if the sender is on your approved list (Safe Senders/Safe Recipients). Everything else goes to Junk Email (or gets deleted if you choose). You stop “managing spam” and start approving people.
This is strict allow-listing. It’s the opposite of hoping spam filters guess correctly. For the methodology difference, see AI Email Sorting vs Whitelisting for Inbox Control.
2. BEFORE YOU START
- Required (desktop Outlook): Outlook for Microsoft 365, Outlook 2024/2021/2019 on Windows (Mac options differ and may not expose the exact same “Safe Lists Only” control).
- Required (web Outlook): Outlook.com or Outlook on the web with access to Settings.
- Required (permissions): You can open Junk email settings. Work/school accounts may be locked by admin policy.
- Optional but helpful: A short list of trusted senders/domains you never want to miss (payroll, boss, bank alerts, key vendors).
- Time estimate:
- Desktop: ~3–5 minutes to enable, ~10 minutes to seed your safe list.
- Web: ~5–7 minutes to enable, ~10 minutes to seed safe senders.
- Propagation: On consumer Outlook.com, changes can take 12–48 hours to behave consistently.
Whitelist-only mode is intentionally strict. Expect some legitimate mail to land in Junk Email until your safe list is complete.
3. THE STEPS
Choose the path that matches where you read email.
Desktop Outlook (Microsoft 365 / 2024 / 2021 / 2019)
Step 1: Open Junk Email Options
Click Home > Junk > Junk E-mail Options.
Expected result: The Junk E-mail Options dialog opens on the Options tab.
If you don’t see Junk on the ribbon, widen the Outlook window or click the ribbon overflow.
Step 2: Switch protection to Safe Lists Only
Select Safe Lists Only under Protection level.
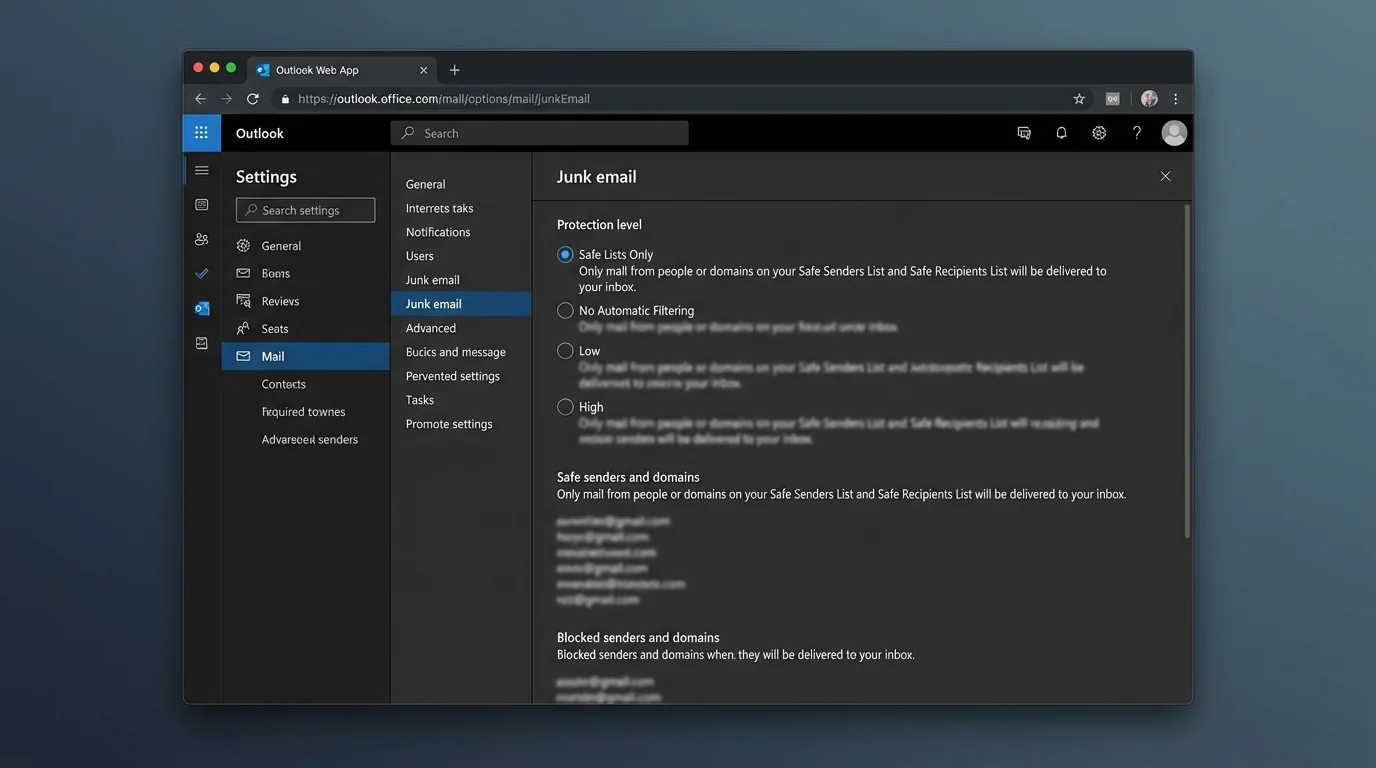
Expected result: Outlook shows the description: only mail from Safe Senders or Safe Recipients is treated as not junk.
Step 3: Decide what happens to everything else
Choose one:
- Leave default behavior (recommended first): unknown senders go to Junk Email.
- Or check Permanently delete suspected junk e-mail.
Expected result: You’ve defined whether “not approved” mail is reviewable in Junk Email or removed.
Only enable Permanently delete after you’ve run safely for a few days. Otherwise you will lose legitimate mail.
Step 4: Add your first safe senders
Click the Safe Senders tab > click Add.
Type an email or domain:
- Email: ap@vendor.com
- Domain: vendor.com
Click OK.
Expected result: The sender/domain appears in the Safe Senders list.
Start with addresses you cannot miss: payroll, HR, your manager, your ticketing system, your bank.
Step 5: Add safe recipients (mailing lists you belong to)
Click the Safe Recipients tab > click Add.
Add list addresses you receive through, like:
- all@company.com
- billing@lists.vendor.com
Expected result: Messages addressed to those recipient addresses are less likely to be treated as junk.
Step 6: Enable auto-whitelisting for people you email
Click the Safe Senders tab > check Automatically add people I email to the Safe Senders List.
Expected result: When you send/reply to someone, Outlook auto-adds them to your safe list.
This is the fastest way to keep whitelist-only mode usable without constant maintenance.
Step 7: Remove conflicts in the Blocked Senders list
Click the Blocked Senders tab.
If you see any address/domain you actually trust, select it > click Remove.
Expected result: Trusted senders are no longer explicitly blocked.
Step 8: Apply and test with a known sender
Click OK to save.
Send yourself a test email from a safe sender (or ask a coworker already on the safe list to email you).
Expected result: The message lands in Inbox. Unknown senders land in Junk Email.
Test three cases: a safe sender, a safe domain, and a brand-new sender.
Outlook on the web (Outlook.com / Outlook Web)
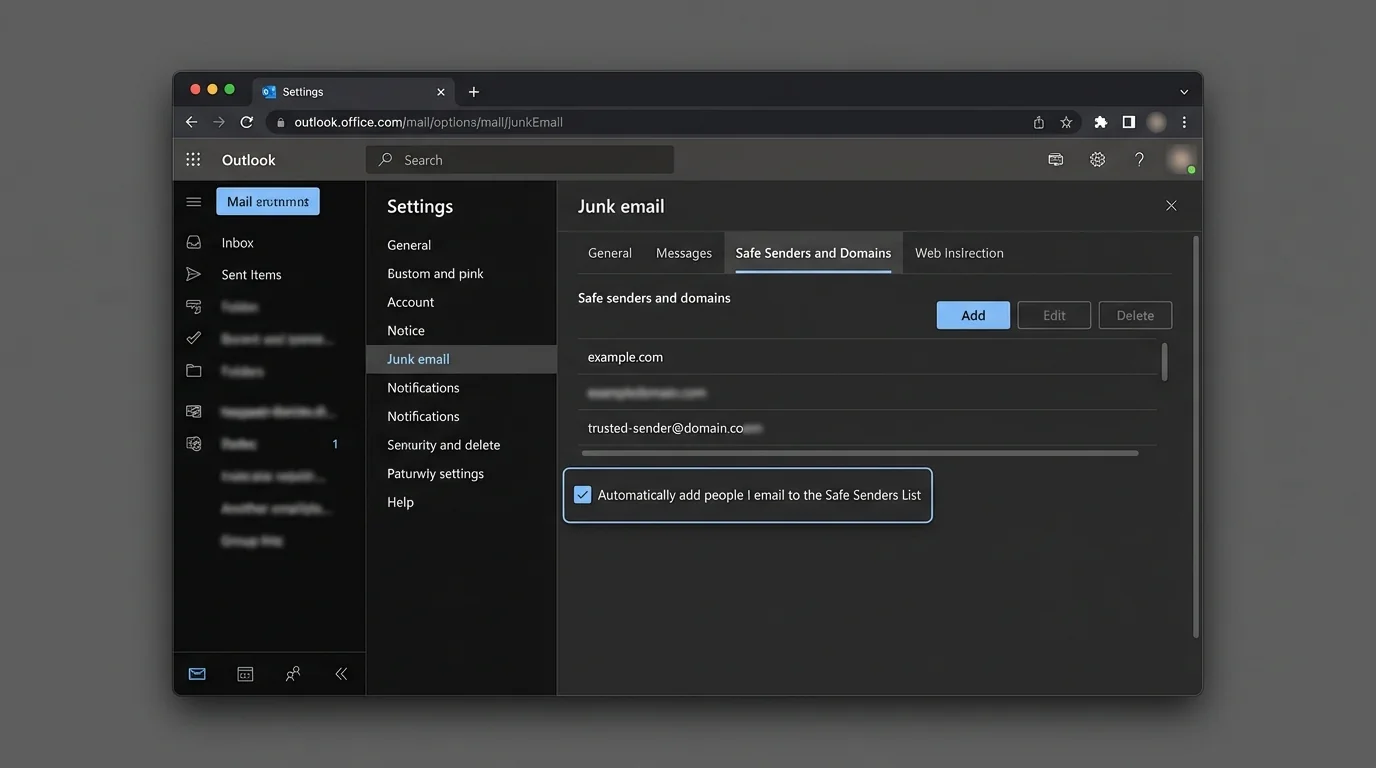
Step 9: Open full settings
Click Settings (gear icon) > View all Outlook settings.
Expected result: The settings panel opens with a left navigation list.
Step 10: Navigate to Junk email controls
Click Mail > Junk email (sometimes shown as Block or allow).
Expected result: You see Safe senders and domains, Blocked senders and domains, and trust options.
Step 11: Add safe senders and domains
Under Safe senders and domains, click Add.
Add values like:
- payroll@company.com
- company.com
Press Enter after each one.
Expected result: Each value appears as an entry in your safe list.
If a domain still fails, add the exact address too (some services send from multiple subdomains or change headers).
Step 12: Turn on whitelist-only trust behavior
Find the checkbox that reads like:
- Don’t trust email unless it comes from someone in my Safe Senders and Recipients list
Check it.
Expected result: Outlook begins treating “not in safe lists” as untrusted (sent to Junk).
Step 13: Save and allow time for propagation
Click Save.
Expected result: Settings are saved.
On some consumer accounts, allow 12–48 hours for behavior to stabilize across web/mobile/desktop.
New Outlook (Windows) tightening tip (optional)
Step 14: Disable implicit trust of contacts (if available)
Click Settings > Mail > Junk email.
If you see Trust email from my contacts, clear it.
Expected result: Being in your contacts no longer automatically bypasses your strict allow-list rules.
Sender Screening (consumer feature) — use carefully
Step 15: Avoid confusing Sender Screening with whitelist-only mode
If you see Sender Screening in consumer Outlook settings, treat it as a triage feature, not a true allow-list.
Expected result: You understand that Sender Screening can reroute important mail into a separate screening area instead of enforcing a clean allow-list.
If you rely on time-sensitive alerts (security codes, fraud alerts, travel changes), Sender Screening can create “hidden inboxes.” Disable it if you miss messages.
4. COMMON PATTERNS (copy-paste examples)
Use these as your “starter whitelist.” Add addresses/domains in Safe senders and domains (web) or Safe Senders (desktop).
-
Payroll and HR
- Add:payroll@company.com,hr@company.com,company.com
- Why: These messages are rare but high impact. -
Banking and MFA codes
- Add:no-reply@bank.com,alerts.bank.com,account@bank.com
- Why: Some banks use multiple sender domains. -
Ticketing / support systems
- Add:support@vendor.com,notifications@vendor.com,vendor.com
- Why: Replies can come from different subdomains. -
Newsletters you actually want
- Add:newsletter@creator.com,substack.com(or the exact sender domain)
- Why: In whitelist-only mode, newsletters are “opt-in by default,” which is the point.
5. THE BETTER WAY (KeepKnown automation)
Whitelist-only mode in Outlook works, but it’s still manual:
- You maintain Safe Senders.
- You troubleshoot when a sender changes domains.
- You still review Junk Email if you don’t permanently delete.
KeepKnown applies the same inversion (only allow the good), but does it at the API/server level instead of relying on client-side rules.
What changes:
- Mechanism: KeepKnown connects with OAuth2 (CASA Tier 2) and filters mail via API—no plugin.
- Action: Non-contacts are automatically moved into a dedicated folder/label like KK:OUTSIDERS.
- Result: Your Inbox becomes “contacts-first” without constant Safe Sender maintenance.
- Security: Encrypted hashes (no plaintext storage).
This directly fights the real villain: algorithmic guessing (Focused/Other tabs), decision fatigue, and notification anxiety. If that loop feels familiar, see Email Anxiety Symptoms: Why “Managing Your Inbox” Is Making You Worse and the methodology breakdown in Best Email Filtering Methods Compared (and Why Strict Allow‑listing Wins).
If you want strict allow-listing without living inside Outlook settings, start at https://keepknown.com.
6. TROUBLESHOOTING
Use these fixes in order. Don’t guess.
-
If a whitelisted sender still goes to Junk, then remove conflicts and re-add precisely
- Action: Check Blocked Senders for the same address/domain and remove it.
- Action: Add the exact sender address (not just the domain).
- Expected result: New messages from that exact sender land in Inbox. -
If changes don’t seem to work, then wait and re-toggle the setting
- Action: On web, uncheck and re-check Don’t trust email unless… then Save.
- Action: Wait up to 24–48 hours on consumer Outlook.com.
- Expected result: The backend applies your allow-list behavior consistently. -
If whitelist-only mode is missing or locked, then assume admin policy
- Action: On work/school accounts, ask IT whether Junk Email settings are enforced by policy (GPO/tenant config).
- Expected result: You either get the setting enabled for you or receive the approved safe-sender process. -
If you see “Blocked by user policy: Exclusive Setting,” then it’s working as designed
- Action: Add the sender to Safe Senders (or ask admin to add it centrally).
- Expected result: The sender is now allowed through your “exclusive/allow-list only” rule.