1. THE OUTCOME
When you finish, Microsoft 365 will treat a defined set of senders (domains, addresses, or sending IPs) as explicitly trusted so their email reliably lands in users’ Inbox instead of Junk Email or Quarantine. Everyone else continues to be filtered normally. You will also have a repeatable process to add new trusted senders without “guessing” with Focused/Other or spam heuristics.
2. BEFORE YOU START
- Required permissions: One of the following:
- Global Administrator (simplest)
- Exchange Administrator or Exchange Online Organization Management (for mail flow rules)
- Security Administrator (for Defender anti-spam + tenant allow/block)
- Required access:
- Microsoft 365 admin center (
admin.microsoft.com) - Exchange admin center (EAC)
- Microsoft Defender portal (
security.microsoft.com) - Required browser: Latest Edge or Chrome (admin portals break on old builds)
- You must know what you’re allow-listing:
- Sender domain (example:
vendor.com) - Sender address (example:
billing@vendor.com) - Sender sending IP range (example:
203.0.113.0/24) - Optional but strongly recommended (prevents “allow-listed but still blocked”):
- Confirm the sender has valid SPF and DKIM, and ideally DMARC.
- Ask the sender for their official sending domains/IPs (marketing platforms often use multiple).
- Time estimate:
- Minimum strict allow-list setup (one method): 15–25 minutes
- Recommended layered setup + test + document: 60–90 minutes
- If you hit “High confidence phishing” overrides: 2–3 hours (because it often requires escalation)
“Strict allow-listing” is not the same as “turning off spam.” You are creating narrow exceptions for known-good senders. Do not allow-list your own domain or broad consumer domains. That is a spoofing magnet.
3. THE STEPS
The most reliable approach is layered allow-listing:
1) Use a mail flow rule for precise bypass (best control),
2) Add the same sender to the Defender anti-spam allow list (policy consistency),
3) If needed, allow-list their sending IP (only when the vendor is stable),
4) Use Tenant Allow/Block List only when you must override spoof decisions.
Step 1: Confirm you can reach the right admin portals
Navigate to admin.microsoft.com and sign in with an admin account.
Then open Admin centers > Exchange.
Expected result: The Exchange admin center loads and you can see the left navigation including Mail flow.
If Exchange doesn’t appear under Admin centers, you likely lack Exchange permissions. Add Exchange Administrator or Organization Management and retry.
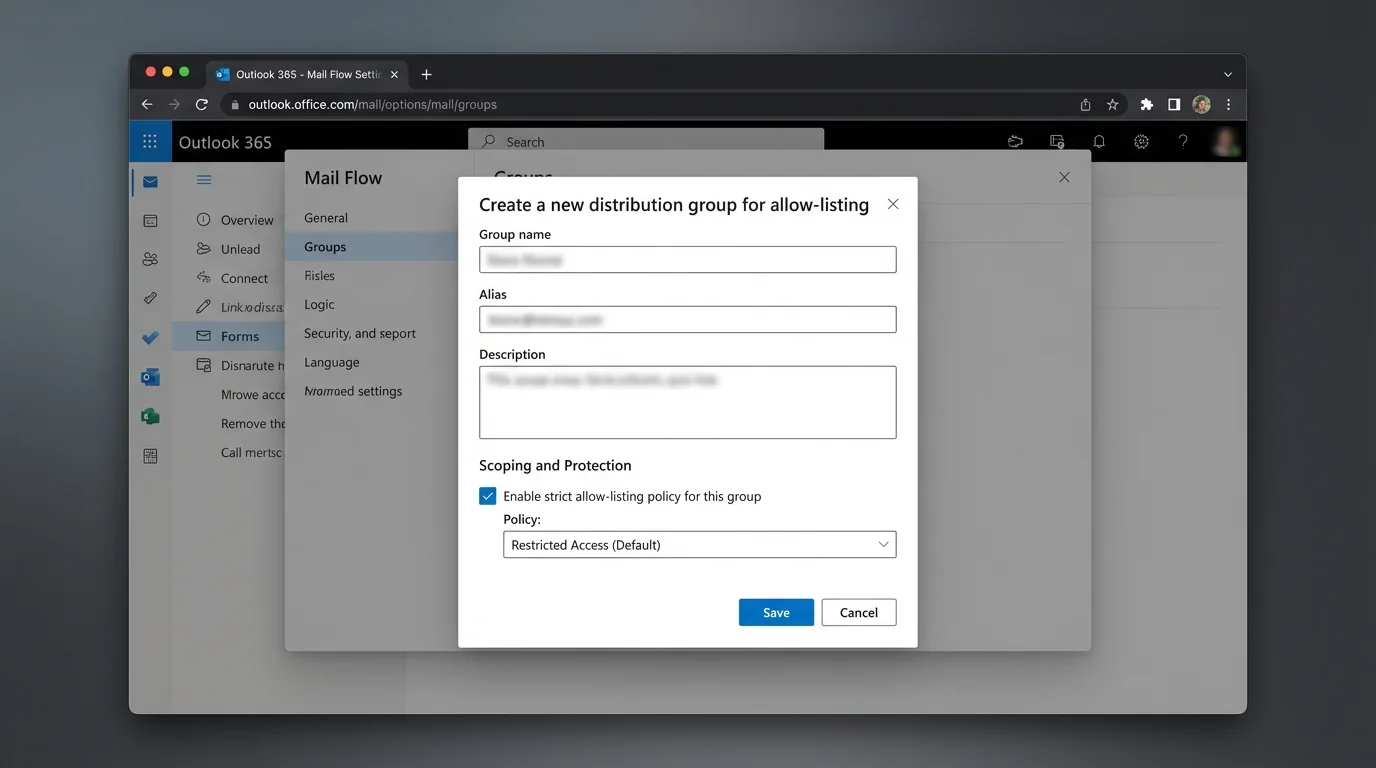
Step 2: Create a dedicated allow-listing group (so scope is controlled)
Click Microsoft 365 admin center > Teams & groups > Active teams & groups > Add a group.
Select Mail-enabled security group (or Security group if you will scope policies another way), name it AllowListed-Recipients, and add the users who should receive these bypassed messages.
Expected result: You have a group that can be selected in policy/rule scoping so you don’t accidentally bypass protections for every mailbox.
Start with a pilot group (IT + one business owner). Expand after you see stable results for 3–5 business days.
Step 3: Add a mail flow rule that bypasses spam filtering (SCL = -1)
In Exchange admin center (EAC), click Mail flow > Rules.
Click Add (the +) > select Bypass spam filtering (or Create a new rule if you want more conditions).
Expected result: The rule editor opens and you can name and configure conditions/actions.
This bypasses spam scoring for matching messages. It does not guarantee delivery if Microsoft flags a message as malware or sometimes high confidence phishing.
Step 4: Scope the rule to a sender domain or address
In the rule editor:
- Type Name: ALW - Trusted Sender Domain - vendor.com
- Under Apply this rule if… choose:
- The sender > domain is (for a whole domain), or
- The sender > is this person (for one address)
- Enter the value, for example:
- Domain: vendor.com
- Address: billing@vendor.com
Expected result: The rule shows your sender condition and validates the entry.
Prefer address-level allow-listing when possible. Domain allow-listing is wider and easier to abuse via lookalikes or compromised accounts.
Step 5: Set the rule action to bypass spam (SCL = -1)
Under Do the following… select:
- Modify the message properties > set the spam confidence level (SCL)
- Set the value to -1
If available, enable Stop processing more rules.
Expected result: The rule explicitly sets spam scoring to bypass for matching messages.
Do not add actions that weaken attachment scanning. Leave malware protections intact.
Step 6: Restrict the bypass to authenticated mail (prevents spoof abuse)
Click Add condition (or More options…) and add at least one “proof” condition. Choose the best fit your tenant supports:
- Condition option A (recommended when available): The message headers… include a known authentication result.
-
Example header checks:
- Header name:
Authentication-Results - Header value contains:
dkim=passorspf=pass
- Header name:
-
Condition option B: The sender > domain is AND sender IP address is in any of these ranges (if the vendor provides stable IPs).
Also add And > The recipient > is a member of > select your group AllowListed-Recipients.
Expected result: Only mail that matches the sender and your authentication/scope rules gets the bypass.
If you can only add one “proof,” pick dkim=pass because it’s harder to fake than a visible From address.
Step 7: Enable the rule and place it at the top
In Mail flow > Rules, find your new rule.
- Set it to Enabled.
- Move it above other rules that might change spam outcomes.
Expected result: The bypass rule is active and evaluated early.
Order matters. A later rule can still redirect, reject, or quarantine mail depending on your configuration.
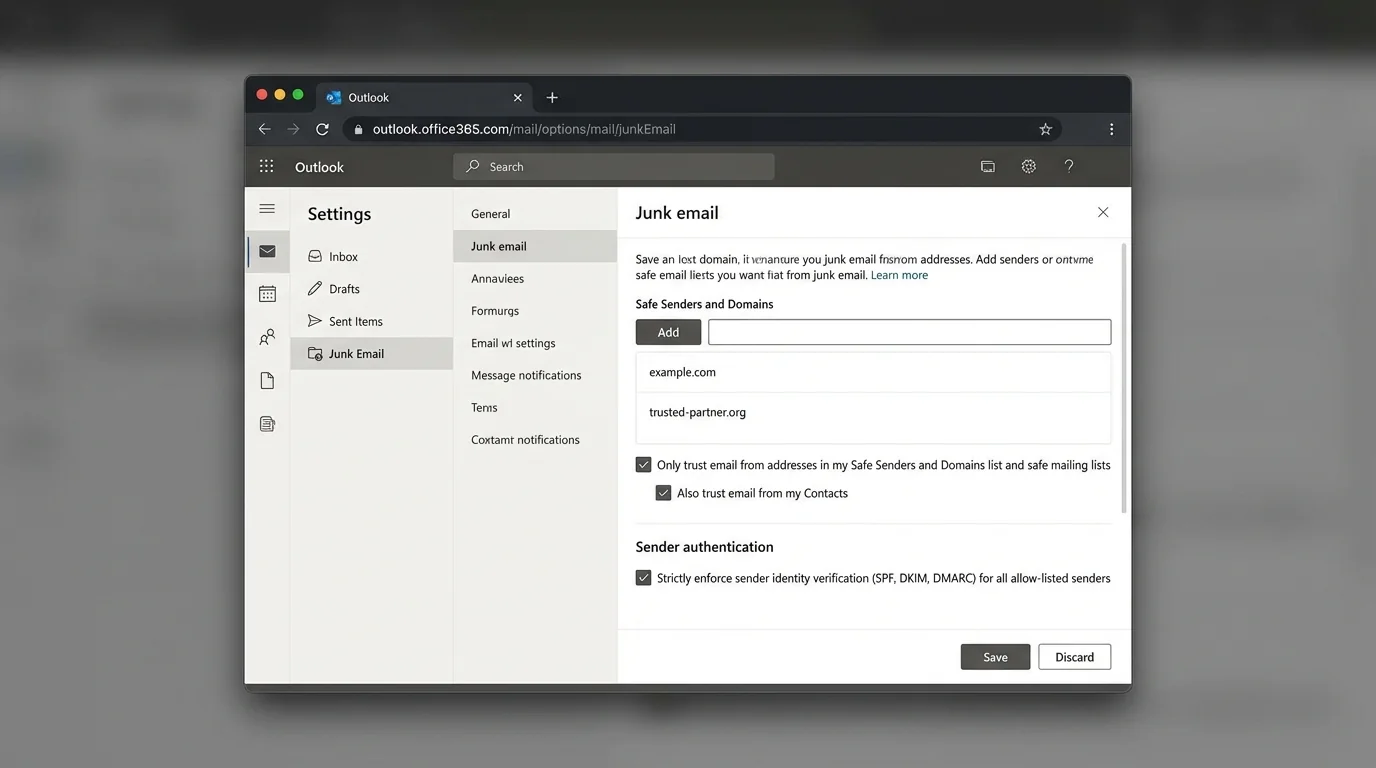
Step 8: Add the sender to Defender anti-spam allowed senders/domains
Open security.microsoft.com.
Navigate to Email & collaboration > Policies & rules > Threat policies > Anti-spam.
Either:
- Click Create policy > Inbound, or
- Select an existing inbound policy scoped to your pilot users.
In the policy wizard, open Allowed and blocked senders and domains:
- Under Allowed > click Manage allowed senders or Manage allowed domains
- Add billing@vendor.com and/or vendor.com
- Click Save
Expected result: The allowed sender/domain appears in the anti-spam policy list and the policy saves successfully.
If you already use multiple anti-spam policies, add allow-list entries only in the policy that applies to your pilot group. Otherwise you’ll create “it works for me but not them” confusion.
Step 9: Configure connection filtering IP allow list (only if you have stable vendor IPs)
In security.microsoft.com, go to Email & collaboration > Policies & rules > Threat policies > Anti-spam.
Open Connection filter policy (Default) (or your applicable policy) > Edit connection filter policy.
Under Always allow messages from the following IP addresses or address range, add vendor IPs, for example:
- 203.0.113.10
- 203.0.113.0/24
Click Save.
Expected result: The IPs appear in the “always allow” list.
IP allow-listing is blunt. If the sender changes infrastructure, mail will fail again. If the sender is compromised, you just created a high-trust path. Use this only when the sender is operationally mature.
Step 10: Use Tenant Allow/Block List for spoof exceptions (only when spoof intelligence blocks legit mail)
In security.microsoft.com, navigate to Email & collaboration > Policies & rules > Threat policies > Tenant Allow/Block List.
Open the relevant section (commonly Spoofed senders).
Click Add and define:
- The spoofed sender you want to allow (exact domain/address as required)
- The scope (keep it as narrow as the UI allows)
Click Save.
Expected result: The spoof entry shows as Allowed in the tenant list.
Tenant Allow/Block List is org-wide power. Only use it when you have verified the sender and you understand why spoof intelligence is firing.
Step 11: Test delivery with Message Trace and Quarantine
Send a test message from the allow-listed sender (or ask the vendor to send one).
Then open:
- Exchange admin center > Mail flow > Message trace
- Search for the recipient and timeframe
Also check:
- security.microsoft.com > Email & collaboration > Review > Quarantine
Expected result:
- Message trace shows Delivered (or Delivered to Inbox)
- The message is not in Quarantine
- The message does not land in Junk Email
In Message Trace details, look for fields showing spam/phish disposition and authentication results. If you see dkim=fail or spf=softfail, fix auth first before expanding allow-list scope.
Step 12: Document the allow-list entry so it stays strict
Create a simple internal record (ticket, runbook page, or spreadsheet) with:
- Who requested the allow-list
- Business reason
- Exact entries added (domain/address/IP)
- Which method(s) used (rule, policy, IP, tenant list)
- Start date and review date
Expected result: You can audit why a sender bypass exists and remove it safely later.
Without documentation, allow-lists only grow. Growth turns “strict allow-listing” into “permanent exceptions,” which recreates the same inbox problem you were trying to solve.
4. COMMON PATTERNS (copy/paste examples)
Use these patterns to keep allow-listing strict, predictable, and hard to exploit.
Pattern 1: Allow a single billing address (best default)
- Sender condition:
billing@vendor.com - Scope:
AllowListed-Recipients - Bypass: SCL
-1 - Proof condition:
Authentication-Resultscontainsdkim=pass
Why this works: one mailbox is easier to monitor and less likely to be abused than an entire domain.
Pattern 2: Allow a vendor domain, but only when DKIM passes
- Sender condition: domain is
vendor.com - Proof condition: header
Authentication-Resultscontainsdkim=pass - Scope: pilot group first
Why this works: DKIM pass is your “receipt” that the vendor truly sent it.
Pattern 3: Allow a marketing platform subdomain, not the whole brand domain
- Sender condition: domain is
mail.vendor.com(or vendor-provided sending domain) - Do not use:
vendor.comif they don’t send transactional mail from there
Why this works: marketing systems often send from separate infrastructure and domains. Target what actually sends.
Pattern 4: Allow by IP only for fixed infrastructure
- Sender condition: sender IP is
203.0.113.0/24 - Scope: Finance team only
- Proof condition (optional): also require From domain
vendor.com
Why this works: good for legacy systems that can’t align SPF/DKIM well, but only if IPs are stable.
If your real goal is “only contacts can reach the Inbox,” strict allow-listing is the methodology you’re reaching for—just implemented in admin rules instead of at the user-contact layer. For the mental model, see AI Email Sorting vs Whitelisting for Inbox Control and Best Email Filtering Methods Compared (and Why Strict Allow‑listing Wins).
5. THE BETTER WAY (KeepKnown Protocol)
Manual strict allow-listing in Microsoft 365 works, but it has three structural problems:
1) It’s hard to keep strict. Every exception request becomes another rule/policy entry.
2) It’s not “contact-first” by default. Admin allow-lists don’t naturally map to each user’s real relationships.
3) It still depends on spam-era thinking. You’re adding patches to an algorithmic sorting system that still guesses wrong.
KeepKnown uses the opposite model: inversion.
- Don’t try to block the bad.
- Only allow the good.
KeepKnown is an API-based email filter (not a plugin) that runs at the server level on Microsoft 365. It automatically moves non-contacts to a dedicated folder/label (for example, KK:OUTSIDERS). That means:
- Your Inbox becomes a high-trust channel.
- Unknown senders are still available (nothing “disappears”), but they stop interrupting you.
- You reduce decision fatigue and notification anxiety because most messages never reach the primary attention zone.
If you want the strict allow-listing outcome as an operating system, not a pile of exceptions, start here: How to Enable Outlook Whitelist Only Mode and How to Set Up a Contact Only Email Filter (methodology applies even when the platform differs). To see why classic approaches fail at scale, compare against “unsubscribe and pray” in Unsubscribe Not Working: Methods Compared That Actually Scale.
Learn more at https://keepknown.com.
6. TROUBLESHOOTING
Use this section when your allow-list “looks right” but mail still lands in Junk or Quarantine.
If mail is quarantined as High Confidence Phishing, then expect overrides
Problem: A sender is allow-listed (rule + policy), but messages still go to Quarantine as High confidence phishing.
Solution:
- Confirm the message classification in security.microsoft.com > Email & collaboration > Explorer (or Quarantine details).
- If it truly is High confidence phishing, understand that this can override allow-list intent.
- Open a Microsoft support case with a few sample message IDs and request review of the classification.
Expected result: Microsoft adjusts the detection (when appropriate) or provides the exact control that is preventing delivery.
If allow-listed domain still goes to Junk, then fix authentication first
Problem: Your rule matches, but the message still gets filtered or treated suspiciously.
Solution:
- Check Authentication-Results in message headers.
- If you see spf=fail or dkim=fail, ask the sender to fix SPF/DKIM alignment.
- Tighten your mail flow rule to require dkim=pass so spoofed lookalikes don’t ride the bypass.
Expected result: Legit messages pass consistently; spoofed messages fail the proof condition and remain filtered.
If it works for one user but not another, then your policy scope is wrong
Problem: One mailbox receives allow-listed mail correctly, another doesn’t.
Solution:
- Confirm the user is inside AllowListed-Recipients.
- Confirm which Anti-spam policy applies (policy priority matters).
- Ensure you didn’t add the allow entry to a policy that doesn’t target that user.
Expected result: Both users fall under the same scoped rule/policy behavior.
If a tenant allow entry is ignored, then validate the exact entity type
Problem: You added an allow in Tenant Allow/Block List, but it doesn’t change outcomes.
Solution:
- Verify you added the correct object type (domain vs address vs spoofed sender).
- Confirm you’re editing the correct tab (Spoof vs URL vs File).
- Add a temporary, narrow mail flow rule for bypass (SCL -1) to prove routing, then refine.
Expected result: You isolate whether the issue is list configuration, policy scope, or a higher-order detection.