1. THE OUTCOME
You will have an organization-managed allow-list for executive mailboxes where approved senders (addresses/domains/IPs) reliably reach the Inbox, while unapproved senders are more likely to be filtered, quarantined, or routed away depending on your policy. This is not “each executive clicks Safe Sender.” It’s centralized, auditable, and consistent across Outlook desktop, Outlook on the web, and mobile.
This approach uses a layered configuration (mail flow rules + Defender allow entries + optional IP allow + spoof overrides) because in Microsoft 365, one allow-list alone is often not enough to beat conflicting policies and high-risk detections. (Also: even allow-listed senders can still be blocked if Microsoft flags the message as high-confidence phishing or malware.)
2. BEFORE YOU START
- Required permissions (you need at least one):
- Global Administrator, or
- Exchange Administrator / Exchange Online Organization Management, and
- Security Administrator (for Microsoft Defender settings)
If Exchange or Security admin centers don’t appear, it’s almost always permissions. (Common in executive support teams.)
- Required access:
- admin.microsoft.com (Microsoft 365 admin center)
- security.microsoft.com (Microsoft Defender portal)
- Exchange admin center (EAC) from Admin centers > Exchange
- Browser: latest Edge or Chrome (older versions break some portal blades).
- You need sender data (collect this first or you’ll stall mid-config):
- Email addresses: ceo.assistant@partner.com
- Domains: partner.com
- Sending IP ranges (only if stable): 203.0.113.10
- Confirmation the sender has sane auth: SPF/DKIM/DMARC (missing auth often looks like spoofing).
- Time estimate:
- 15–25 minutes for one sender/domain in one layer
- 60–90 minutes for the recommended layered setup + testing
- 2–3 hours if you hit high-confidence phishing overrides and need deeper investigation
Optional but helpful first:
- Decide your executive scope: 3–10 mailboxes? One group? All execs + EAs?
- Decide what “allow” means operationally:
- “Always deliver to Inbox” (strong)
- “Don’t quarantine, but still scan” (balanced)
- “Only allow known senders” (strict; requires process)
Related reading for policy clarity: VIP Lists vs Strict Allow Lists for Executive Email and Deterministic vs Probabilistic Email Filtering for Executives.
3. THE STEPS
Step 1: Inventory trusted senders and define “executive allow” scope
Create a list of what you are actually allowing:
- Exact senders: name@domain.com
- Domains: domain.com
- Vendors that send from many subdomains (be careful): *.vendor.com
- Optional IPs: 198.51.100.0/24 (only when you are confident they’re stable)
Then define the target executives:
- Specific mailboxes (recommended initially)
- A Microsoft 365 group or mail-enabled security group (scales better)
Expected result: You have a clean, copy-paste allow dataset and a clear “who it applies to” list.
If you don’t already have a controlled list of “good senders,” you’re about to build policy on quicksand. Start with the executive’s calendar invite senders, board contacts, legal, banking, top customers, and their assistants.
Step 2: Verify you can access Exchange and Defender admin centers
Navigate to Microsoft 365 admin center (admin.microsoft.com) > Admin centers > Exchange.
Then open a second tab to Microsoft Defender (security.microsoft.com).
Expected result: You can open Exchange admin center and Defender portal without permission errors.
If Exchange doesn’t show under Admin centers, do not guess. Request the minimum role needed (Exchange Admin) instead of Global Admin where possible.
Step 3: Create a mail flow rule to bypass spam filtering for trusted senders
This is the “always try to deliver” layer.
Navigate to Exchange admin center > Mail flow > Rules > Add a rule.
Configure:
- Name: EXEC Allow - Trusted Senders Bypass Spam
- Apply this rule if… choose one (or multiple):
- The sender is user@partner.com (exact address)
- The sender domain is partner.com
- (Advanced) The sender’s IP address is in any of these ranges 203.0.113.10
- Do the following… select:
- Modify the message properties > Set the spam confidence level (SCL) to -1 (bypass spam filtering)
- Except if… (strongly recommended):
- The message subject includes invoice (example) — only if you have known abuse patterns
- Or skip exceptions initially and rely on Defender malware protections
- Apply this rule to the executive scope:
- Use The recipient is… (exec mailboxes), or
- Use The recipient is a member of (exec group) if your tenant supports it
Expected result: A visible rule exists in Mail flow > Rules that explicitly bypasses spam filtering for your allow entries.
Keep this rule narrow. Executives are high-value targets, and broad bypass rules become a spear-phishing fast lane.
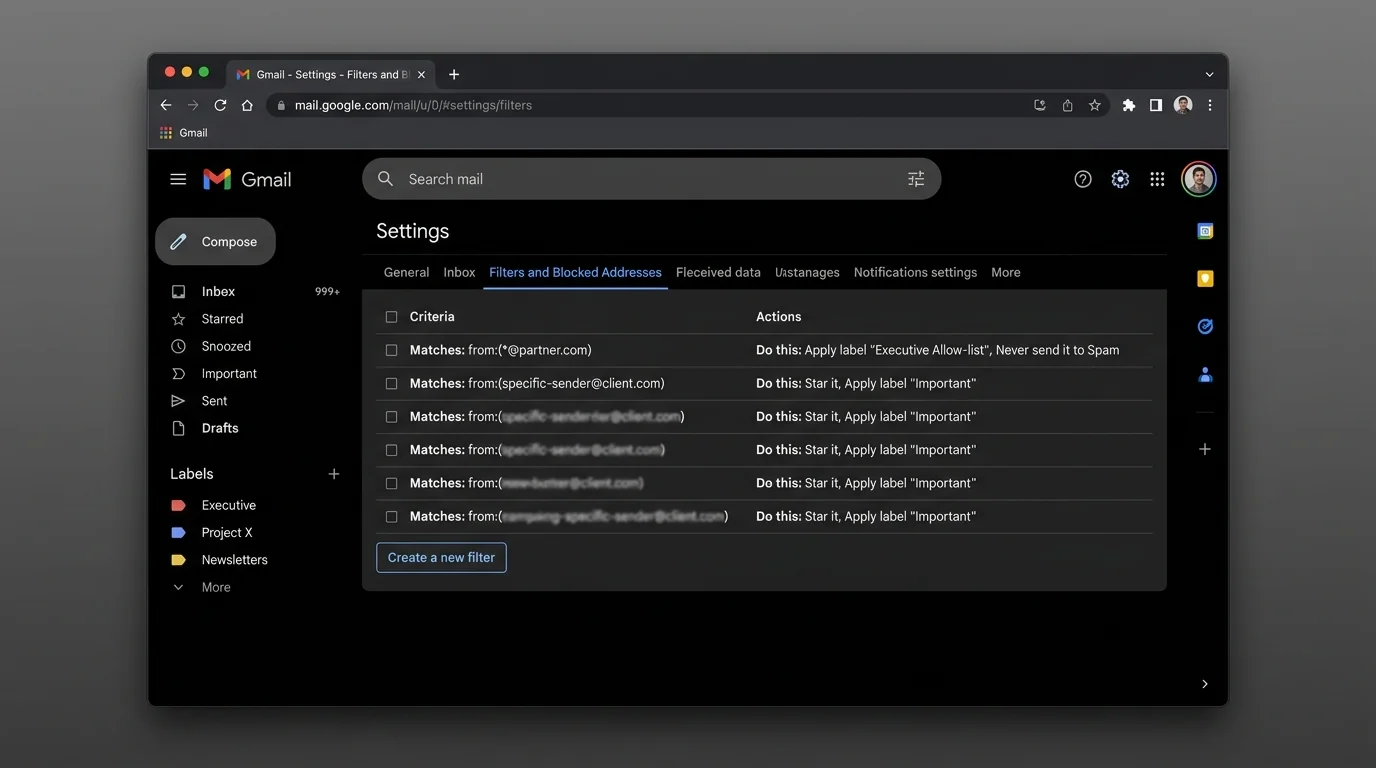
Step 4: Add allow entries to the Tenant Allow/Block List for senders/domains
This is the “global memory” layer for known-good senders.
Navigate to Microsoft Defender portal (security.microsoft.com) > Email & collaboration > Policies & rules > Threat policies > Tenant Allow/Block List.
Add entries under the relevant tab (commonly Senders and Domains):
- Add user@partner.com
- Add partner.com
If you prefer automation or bulk operations, use PowerShell (example pattern):
- Set-TenantAllowBlockListItems -ListType Sender -Entries <emailOrDomain>
Expected result: The sender/domain shows as Allowed in the Tenant Allow/Block List.
This does not mean “nothing can ever block it.” High-confidence phishing/malware detections can still override allow entries.
Step 5: Reinforce allow behavior in Defender anti-spam policies
This step reduces “it’s allowed but still goes to Junk” surprises caused by policy mismatches.
Navigate to Microsoft Defender portal (security.microsoft.com) > Email & collaboration > Policies & rules > Threat policies > Anti-spam.
Review (or create) the policy that applies to executives:
- Target it to your executive group (preferred) or specific users.
- Add allowed senders/domains in the policy allow lists where appropriate.
Expected result: Executives have a clearly scoped anti-spam policy with explicit allow entries.
Executives should have their own policy scope. If you mix them into the global default policy, you’ll constantly trade off between “CEO can’t miss mail” and “everyone else shouldn’t get garbage.”
Step 6: Add IP allow-listing only when the sender’s infrastructure is stable
IP allow-listing is powerful and dangerous. Use it only when:
- The vendor confirms their outbound IP ranges.
- The ranges are small and stable.
- The sender’s domain authentication is correct.
Navigate to Exchange admin center > Protection (or Mail flow protections depending on your UI) > Connection filter policy.
Add the sending IP(s) to the IP Allow list.
Expected result: The vendor’s mail servers are treated as trusted at the connection layer.
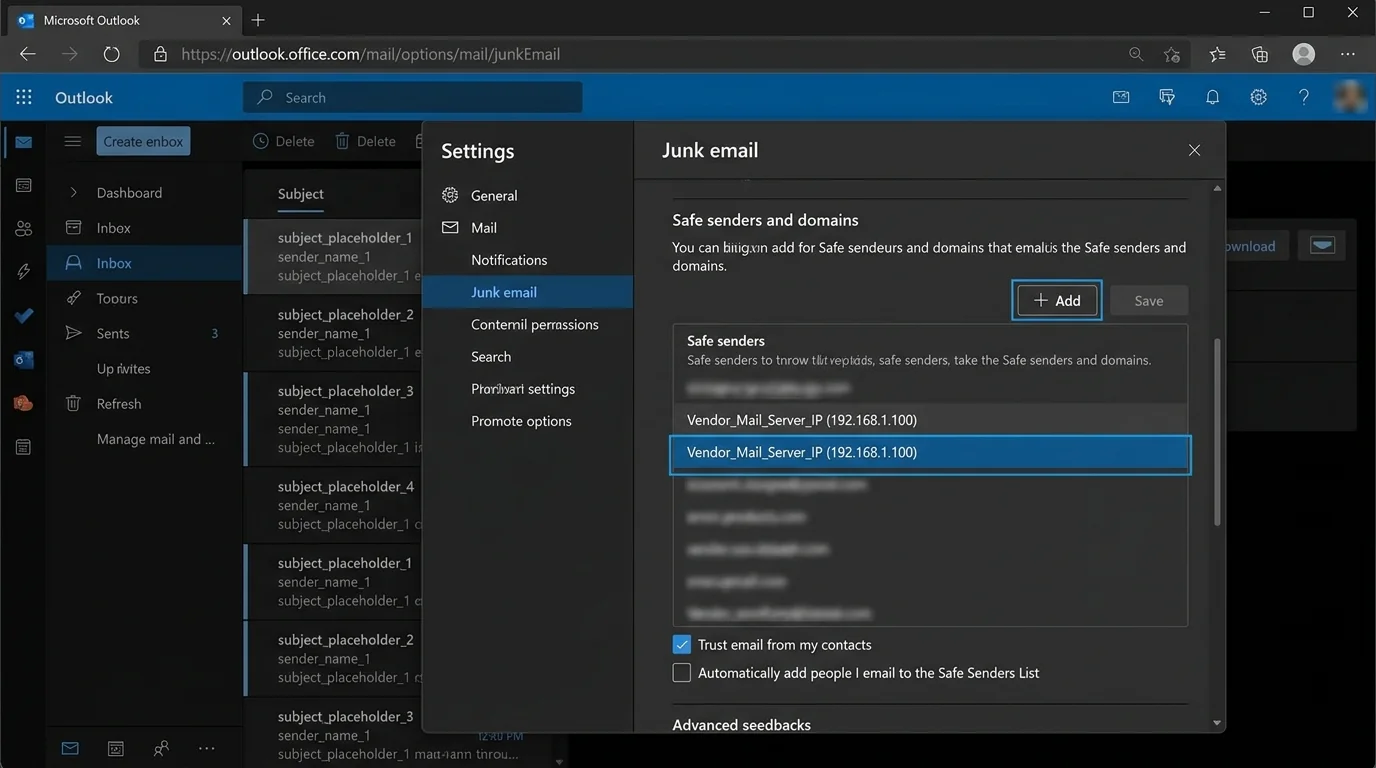
If the vendor uses shared email platforms, IP allow-listing can accidentally bless other tenants’ mail. Default to sender/domain allow-listing first.
Step 7: Handle spoofing scenarios with Tenant Allow/Block List spoof overrides
Executives often receive:
- “Looks like the CFO” (display name spoof)
- “Looks like the bank domain” (domain spoof)
Navigate to Microsoft Defender portal > Threat policies > Tenant Allow/Block List and review spoof-related controls (depending on your tenant’s available blades).
Use allow entries only when:
- You’ve validated the sender’s legitimate infrastructure.
- SPF/DKIM alignment is correct.
Expected result: Legitimate but previously flagged spoof-like mail from trusted partners is less likely to be blocked.
If your execs regularly work with agencies and PR firms, you will see frequent “spoof-like” patterns caused by forwarding, shared systems, and misconfigured DKIM. Fix sender auth where possible; don’t paper over it with broad exceptions.
Step 8: Disable probabilistic inbox guessing for executives (optional but recommended)
Focused Inbox and similar “AI sorting” creates a second failure mode: important mail is delivered but hidden.
For the executive mailbox:
- In Outlook settings, disable Focused Inbox (tenant-wide controls vary).
Expected result: Executives see one consistent Inbox view; you remove “it was in Other” as an excuse.
This is methodology, not cosmetics: you’re removing probabilistic sorting from the executive workflow.
Related: How to Disable Focused Inbox and Clutter Permanently.
Step 9: Decide whether to use Outlook “Strict” safe-senders-only mode (with caution)
Some Outlook clients expose a “Strict” junk mode: “individually decide who is allowed to send you mail.” This is appealing for executives—but it can create silent misses if not paired with a rigorous onboarding process.
If you enable strict mode:
- Make sure your executive allow dataset is complete.
- Make sure there is an escalation path (assistant/admin review folder).
Expected result: Unknown senders are aggressively routed to Junk or blocked depending on the client, reducing inbound attack surface—but increasing operational risk if your allow list is incomplete.
User-level Safe Senders does not reliably override organization-level policies, and behavior varies across clients and caching. Don’t build your executive security posture on per-user clicking.
Step 10: Test delivery and verify policy hits with message trace
Testing is where most teams skip—and where executives get burned.
Send test emails from:
- An allow-listed address
- An allow-listed domain but not address (if you allowed domain)
- A non-allow-listed external address
Then verify via message tracing:
- Navigate to Exchange admin center > Mail flow > Message trace.
- Trace the executive recipient and inspect:
- Delivery location (Inbox/Junk/Quarantine)
- Applied rules and filtering outcomes
Expected result: You can prove (not guess) that allow-listed messages deliver as intended and you can see where non-allow-listed mail lands.
If a stakeholder says “it disappeared,” message trace is the fastest truth source. Keep a saved filter for each executive.
Step 11: Document the allow-list change process so it doesn’t rot
Define one lightweight intake path:
- Who can request allow additions (executive, EA, security)?
- What proof is required (recent email header, vendor confirmation, SPF/DKIM status)?
- How fast you commit to action (same day for execs)
Expected result: You have a repeatable process that prevents random, risky allow exceptions.
If you don’t define a change process, your allow list becomes “everyone’s emergency” and eventually turns into a bypass-everything rule.
4. COMMON PATTERNS (copy/paste examples)
Use these patterns to decide the smallest safe allow entry that achieves delivery.
Pattern 1: Board members and investors (exact sender allow)
- Allow:
board.member@firm.com - Layer: Mail flow rule + Tenant Allow/Block List (Sender)
- Why: Their domains may have many unrelated senders; you only need the person.
Pattern 2: Legal counsel (domain allow with tight scope)
- Allow:
lawfirm.com - Apply to: Executive group only
- Why: Legal teams often rotate staff; domain allow prevents constant updates.
Pattern 3: Bank/wire vendors (domain allow + extra verification)
- Allow:
bank.com - Add requirement: Verify sender SPF/DKIM/DMARC alignment before allowing
- Why: Financial workflows are a phishing magnet; you want deterministic rules.
Pattern 4: PR/news monitoring tools (IP allow only if stable)
- Allow: Vendor outbound IP range
203.0.113.0/24(only if confirmed) - Why: Some systems send from many “From:” identities; IP can be a last resort.
5. THE BETTER WAY (The KeepKnown Protocol)
Manual allow-listing inside Microsoft 365 works, but it has three structural problems for executives:
1. It’s policy-spread: EAC rules, Defender policies, tenant allow lists, client quirks.
2. It’s probabilistic at the edges: “Focused/Other” and changing threat models still create surprises.
3. It’s high-maintenance: Every new relationship becomes an admin ticket.
KeepKnown flips the model: instead of trying to guess what’s bad (blacklists, spam filters, AI sorting), it enforces strict allow-listing / contact-first filtering at the server level.
- Mechanism: API-based email filter (not a plugin), works across Microsoft 365.
- Action: Moves non-contacts into a separate folder/label (for example, KK:OUTSIDERS).
- Security: OAuth2 verified, CASA Tier 2, encrypted hashes (no plaintext storage).
What changes operationally:
- You stop fighting “why did Microsoft sort this weirdly?”
- Executives get a deterministic inbox: known people in, strangers routed away
- Assistants can review outsiders without executives seeing the noise
If you want the methodology behind this inversion (allow the good; don’t chase the bad), read: Curated Inbox Cognitive Hygiene Wins and Server-Side vs Client-Side Email Filtering Security Tradeoffs. KeepKnown lives at https://keepknown.com.
6. TROUBLESHOOTING
If allow-listed mail still goes to Junk, then check for high-confidence phishing/malware
Cause: Microsoft can override allow behavior when it has high confidence the message is dangerous.
Fix: In Defender, review quarantine and threat details; confirm whether it was flagged as high-confidence phishing/malware. If it is, do not “bypass everything.” Work with the sender to fix authentication and content patterns.
If Safe Senders works for some users but not executives, then stop relying on user-level lists
Cause: User-level Safe Senders often do not override org policies; caching and policy precedence varies.
Fix: Put the allow entries at the org layer (mail flow + Tenant Allow/Block List + Defender anti-spam policy scoped to execs). Wait for propagation where required.
If changes don’t apply immediately, then wait for propagation and re-test with message trace
Cause: Policy propagation and client caching can take time.
Fix: Wait up to 24 hours, then re-run a controlled test and validate with Message trace.
If “Trust sender” banners still appear, then treat it as UI, not delivery
Cause: User-facing trust indicators aren’t always removed by org allow-listing.
Fix: Focus on delivery outcomes (Inbox vs Junk vs Quarantine) and use message trace/threat explorer to prove rule impact. Adjust Defender policy if the banners reflect real auth failures.